Payment Request
Payment Request lets you create a QR code that already contains the amount you want to receive and share it with the other person. When the sender scans that QR code or pastes the request link, the receiving address and the amount are filled in automatically.
Because you no longer need to copy your address and tell the other person the amount separately, it reduces mistakes caused by mistyping an address or an amount.
Payment Request is available on Bitcoin-family networks, Ethereum and EVM networks, Kaia, XRP, Solana, and TRON. See Supported networks below for details.
Creating a payment request
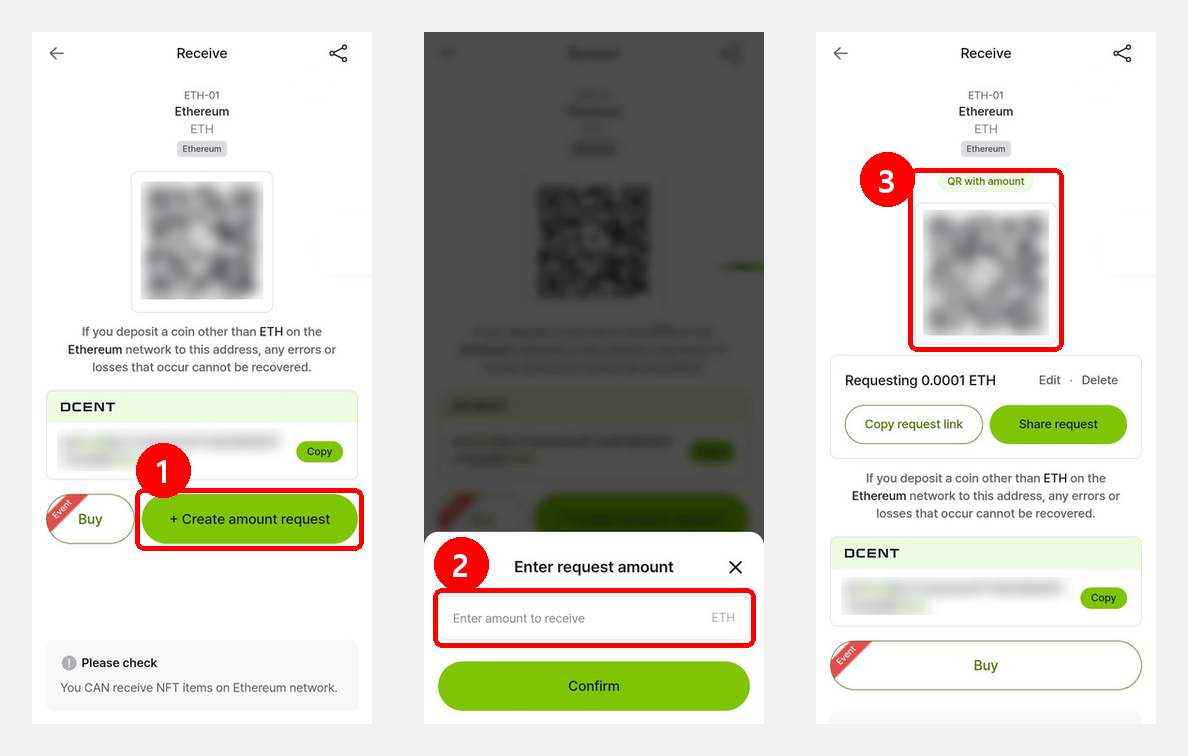
1) On the Receive screen, select the coin you want to receive and tap the "+ Create payment request" button.
2) Enter the amount you want to receive in the "Enter request amount" dialog and tap "Confirm".
3) The QR code is regenerated with the amount included, and a "QR with amount" label appears above it. Show this QR code to the other person.
If you are not meeting in person, tap "Copy request link" or "Share request" to send the link through a messenger or text message.
To change the amount of a request you created, tap "Change". To remove it, tap "Delete". Deleting returns the screen to the plain address QR code.
You can create a payment request the same way from token accounts on Ethereum, Solana, TRON, and other networks. Note that XRP IOU tokens do not support creating a payment request.
Sending coins with a payment request
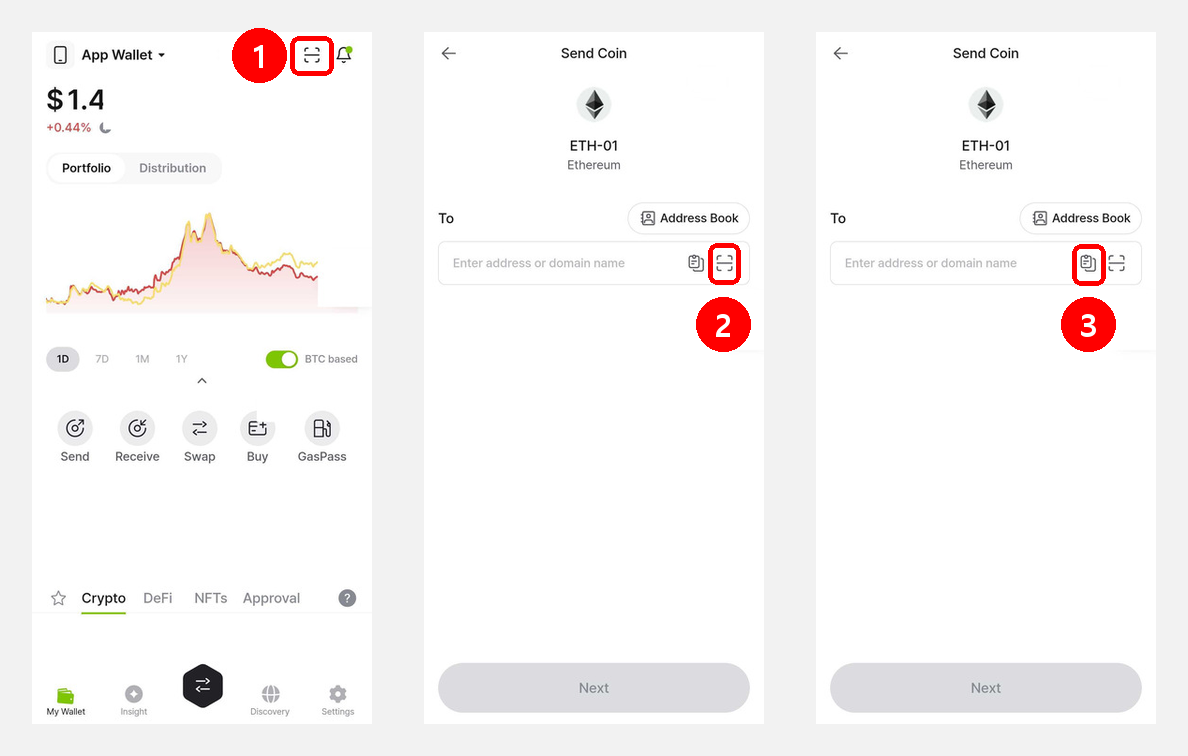
1) Load the request using one of the following three methods. The confirmation steps that follow are the same no matter which one you use.
- ① DCENT app → Tap the "Scan QR" button at the top right of the [My Wallet] tab → Scan the other person's QR code.
- ② Open a coin account's Send screen → Tap the "Scan QR" icon next to the address field → Scan the other person's QR code.
- ③ Open a coin account's Send screen → Tap the "Paste" icon next to the address field → Paste the request link you received.
With method ① you do not have to choose the coin in advance. The app reads the QR code, identifies the coin, and takes you straight to that coin's Send screen. If the coin account is not in your wallet, you are prompted to add it.
The browser extension has no camera, so QR scanning is not supported. Use method ③ and paste the request link into the address field.
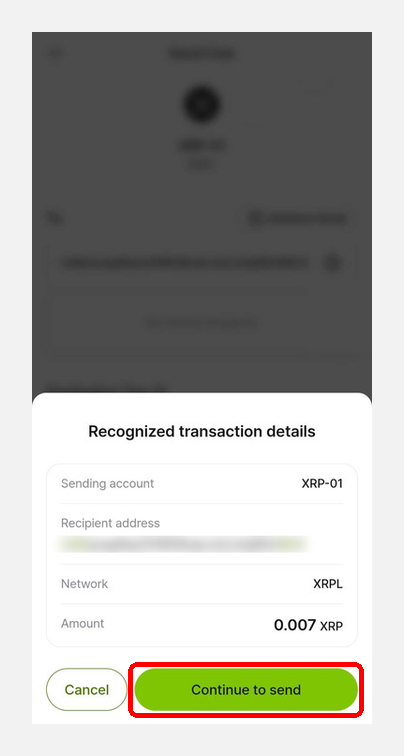
2) Once the request is recognized, the "Recognized transfer information" screen appears. Check the sending account, receiving address, network, and amount, then tap "Continue transfer".
If anything looks different from what you expected, tap "Cancel".
3) The Send screen opens with the amount already filled in. Check the network fee, then authenticate with your fingerprint or PIN on the wallet to sign and complete the transfer.
The scanned amount cannot be changed on the Send screen. If you need a different amount, ask the other person for a new request, or tap "Cancel" and enter the address manually.
Checking the recognized transfer information
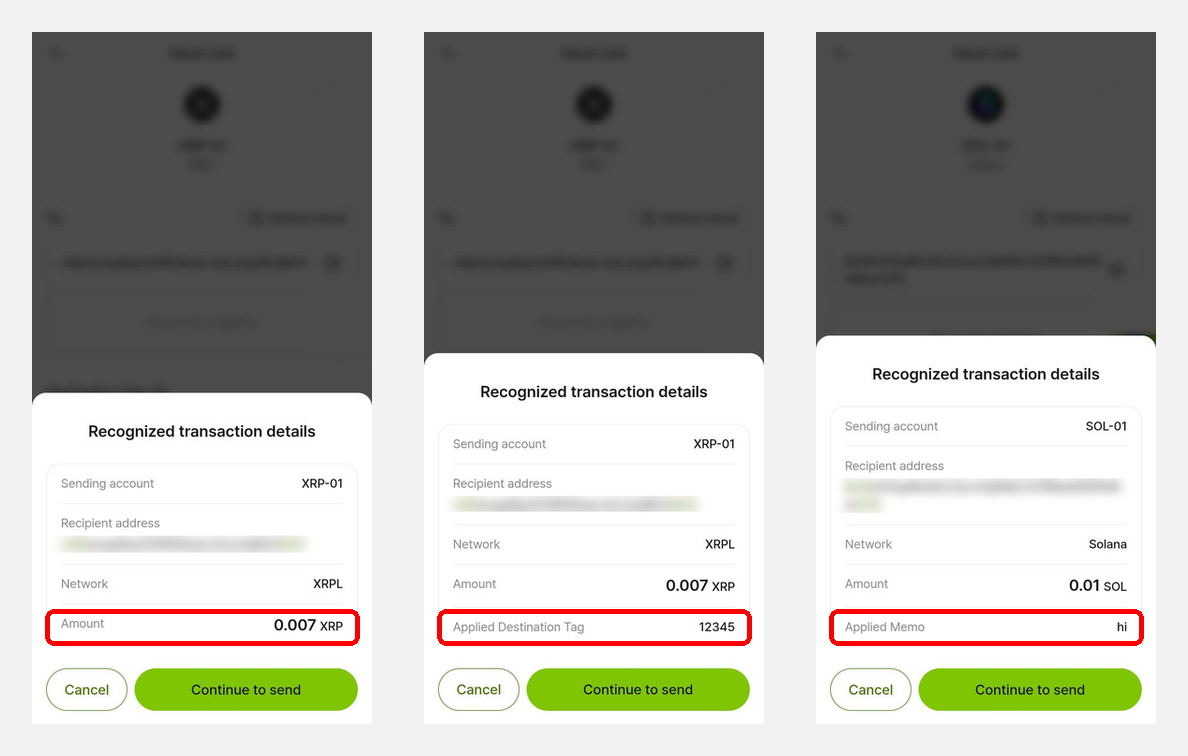
The "Recognized transfer information" screen shows the following items. Everything you need to check before signing is on this screen.
| Item | Description |
|---|---|
| Sending account | The account the coins are withdrawn from. For a token request, the token account (for example, USDT-01) is shown. |
| Receiving address | The address contained in the QR code. The first and last characters are highlighted, so compare them with the address the other person gave you. |
| Asset | The name of the requested token (for example, Tether (USDT)). Shown only for token requests. |
| Network | The network the coins move on. Ethereum, Base, and Polygon share the same address format but are shown separately. |
| Amount | The requested amount. It is shown with the exact number of decimal places requested, without rounding or truncation. |
| Applied Destination Tag Applied Memo | Shown as Destination Tag for XRP and as Memo for Solana. If the QR code contains no tag or memo, this row does not appear. |
Always compare the receiving address and the network with the information you received from the other person. A QR code only fills in the details for you, and assets sent on a blockchain cannot be recovered.
When a transfer is restricted
The screen title and buttons change depending on the type of problem. When only the amount is a problem, the app offers a way to keep using the address. When the address itself is a problem or the format cannot be identified, no button to continue is provided.
Insufficient balance or a tag that cannot be applied
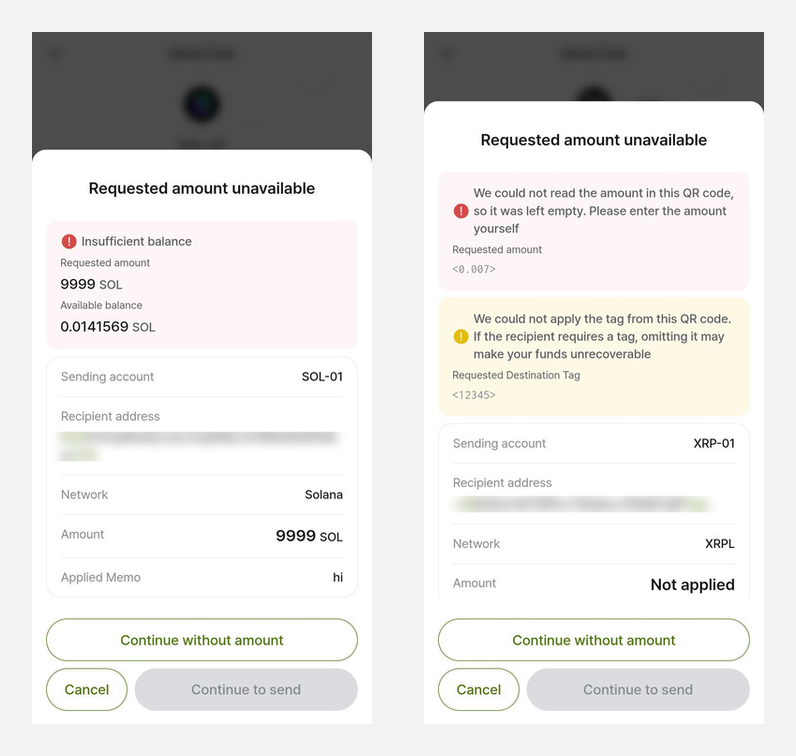
1) Insufficient balance
The screen title changes to "This requested amount cannot be used", and the requested amount and your balance are shown side by side. The "Continue transfer" button is disabled.
To keep the address and enter the amount yourself, tap "Continue without amount". To send the exact amount requested, tap "Cancel", top up the coin, and try again.
2) The tag in the QR code cannot be applied
If the tag in the QR code has an invalid format or the values conflict, the message "The transaction tag in the QR could not be applied" appears together with the tag as it was written in the QR code.
You must do one of the following before the "Continue transfer" button becomes available.
- Enter the correct tag in the "Enter Destination Tag manually" field.
- If the address does not need a tag, select "I understand the risk and will send without a Destination Tag".
3) The amount in the QR code cannot be read
If the amount in the QR code cannot be interpreted, the message "We could not read the amount in this QR code, so it was left empty. Please enter the amount yourself" appears and the amount stays "Not applied". The address is still used, so you can enter the amount yourself and continue.
A Destination Tag is required when sending to an exchange address. Without it, the deposit may not be credited to your account and the assets may not be recoverable.
Sending to the same address, or a QR code that cannot be recognized
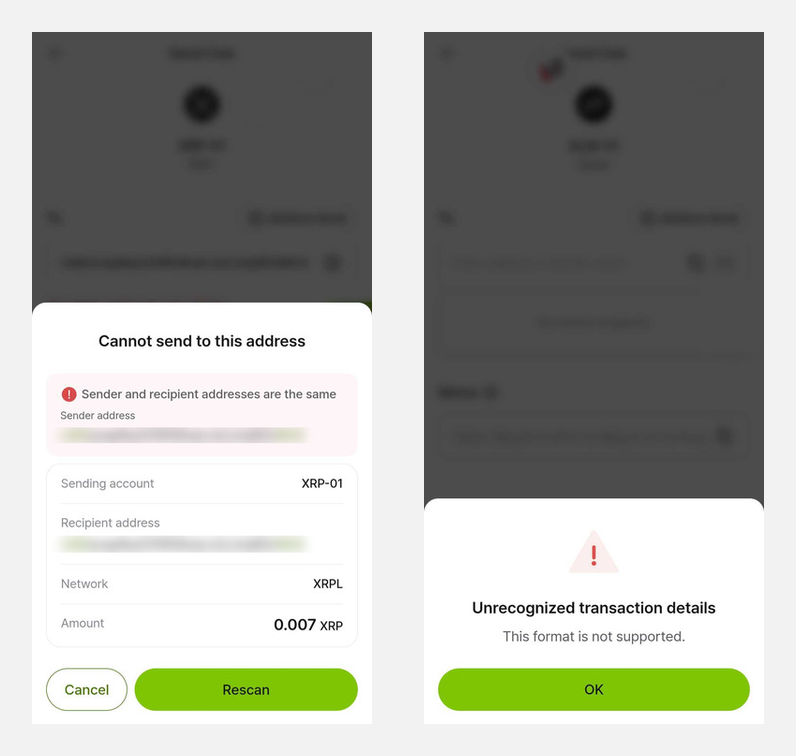
1) The sending and receiving addresses are the same
On XRP and TRON-family networks, the screen title changes to "You cannot send to this address" and the sending address is shown so you can compare. Tap "Scan again" and read the other person's QR code.
Behavior differs by network when the sending and receiving addresses are the same.
- Networks that block the transfer — XRP and TRON families
- Networks that allow the transfer — Ethereum and EVM networks, Solana, and Bitcoin families
On networks that allow it, sending to your own address is not blocked. Please verify yourself that the receiving address belongs to the other person.
2) The QR code cannot be recognized
"Transfer information cannot be recognized – this format is not supported by the wallet" appears with only a "Confirm" button. No path forward is offered, so an invalid value never reaches the Send screen.
QR codes from networks that do not support Payment Request also lead to this screen. Check Supported networks below; for coins that are not listed, enter the address manually as before.
Sending XRP without a Destination Tag
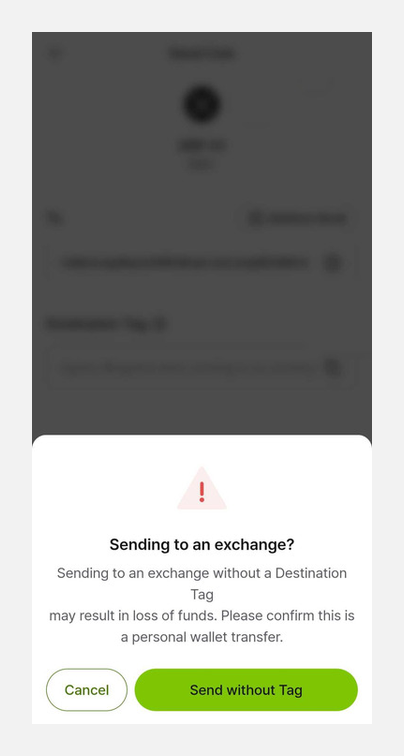
If you try to send XRP without a Destination Tag, an extra "Is this an exchange deposit?" confirmation screen appears.
- Sending to an exchange — Tap "Cancel", enter the Destination Tag provided by the exchange, and try again.
- Sending to a personal wallet — Confirm that the receiving address is a personal wallet, then tap "Send without tag" to continue.
If you deposit XRP to an exchange without a Destination Tag, the exchange may not be able to credit the deposit to your account, and the assets may not be recoverable.
Supported networks
Creating a payment request (receiving) and recognizing a request (sending) support the same networks.
| Network | Coin | Token | Notes |
|---|---|---|---|
| Bitcoin family BTC, BCH, LTC, DOGE, ZEC, DASH, DGB, RVN, BTG, eCash, Horizen | O | – | |
| Ethereum and the EVM networks supported by the wallet Base, Polygon, and others | O | O | Networks are identified separately even when the address format is the same. |
| Kaia | O | O | |
| XRP | O | X | A Destination Tag can be included. IOU tokens do not support creating a payment request. |
| Solana | O | O | A Memo can be included. |
| TRON | O | O |
Stellar (XLM), Hedera (HBAR), Cosmos (ATOM), Algorand (ALGO) and similar networks do not support Payment Request. Scanning a QR code for those coins shows "Transfer information cannot be recognized", which is expected behavior. Enter the address manually as before.